Simple IVR
With this guide you will learn how to use the Simple IVR designer, a tool for creating basic telephone flows. It is designed as an intuitive and easy alternative to the flow designer, with fewer activities and a more friendly interface.
When to Use a Simple IVR?
The Simple IVR is designed for scenarios where you need a quick, basic, and easy-to-maintain telephone flow, without the complexity of the advanced flow designer.
It is recommended when:
- You only need a simple options menu (e.g., "Press 1 for Support, Press 2 for Sales").
- You want to play pre-recorded messages or text-to-speech before transferring the call.
- You are looking for a simple multilingual IVR without complex configurations.
- The team managing it is non-technical and requires an intuitive interface.
It is not recommended when:
- The flow requires advanced logic (variables, validations, integrations).
- You want to automate complex processes (e.g., database queries, dynamic flows).
- The IVR will have many menu levels or requires specific customizations.
In those cases, it is better to use the advanced flow designer. Learn how to use it with the following guide
How to Create a Simple IVR?
- Go to the Automations menu from the Administrator menu.
- Navigate to the IVRs tab.
- Click the New button in the upper right corner.
- A modal will appear where you must assign a unique name to the IVR, and then in the type field select Simple IVR. Optionally, you can add a description that clarifies the IVR's behavior.
Workspace
Once you have created the Simple IVR, the following workspace will automatically open, where you can add and configure activities to build the custom logic that fits your business needs.
The workspace is divided into two main panels:
- Left panel: shows the hierarchical structure of the IVR. Here you can see how the activities connect to each other and rename them for easy identification.
- Right panel: when you select an activity, you will see its configuration form. From here you can define audio files, destinations, languages, or other parameters depending on the activity type.
This way, the left panel gives you an overview of the flow, while the right panel lets you adjust the details of each step.
Features
- History: the History allows you to access previous versions of your Simple IVR to recover unwanted changes or review previous configurations.
- After recovering a previous version, you must save or deploy the IVR again for the changes to take effect.
- Export: with the Export button you can download your IVR as a
.TXTfile.- This file contains the complete flow configuration.
- It is useful for saving a backup or sharing the design with another team.
- Import: with the Import button you can load a previously exported IVR.
- You must select the file from your computer using the file selector.
- Only IVRs that have been exported from the same platform are supported.
- Test phone: the Test phone feature allows you to make a direct call to the IVR to test the flow in real time.
- You will hear the configured audio files and can interact with the menu options.
- It is ideal for verifying the user experience before deploying changes to production.
States
Activities
Each activity has a different functionality and requires specific configuration. You can see all the activities in your IVR in the tree in the left panel.
 Set Language
Set LanguageThis activity is used to set the language of the IVR. You can configure it in two ways:
Single language
- Directly select the default language from the Language field.
- The entire IVR will run in that language.
Multiple languages
- Check the Multiple languages checkbox.
- Assign an initial audio that tells the user the options (e.g., "Press 1 for English, Press 2 for Spanish").
- Define an error audio in case the user presses an invalid key.
- In the Options section:
- Select the number the user should press.
- Associate that number with a language.
- For example:
- Option 1 - ENG
- Option 2 - ESP
 Menu
Menu
MenuThe Menu activity allows you to offer different options to the user so they can navigate the IVR and execute the corresponding branch of activities based on the number they press on their phone keypad.
How does it work?
- The configured audio plays (for example: "For Support press 1, for Sales press 2").
- The system waits for the user to press a number on their keypad.
- If the number matches a valid option, the IVR continues with the associated branch of activities.
- If the number does not correspond to any option, the error audio plays and the activity starts over.
Configuration
- Main audio: message with instructions for the user.
- Error audio (optional): message that plays if the user presses an invalid option.
- Options: list of numbers and the activity to execute in each case.
Practical example
A basic phone service IVR:
- Audio: "Welcome. For Support press 1. For Sales press 2."
- Option 1: Transfer to the Technical Support campaign.
- Option 2: Transfer to the Sales campaign.
- Error audio: "The option entered is not valid, please try again."
This way, the user can easily navigate and be directed to the correct area.
 Play Audio
Play AudioThe Play Audio activity allows you to transmit a recorded message to the user at any point in the IVR flow. It is ideal for providing information, notices, or welcome messages without requiring any interaction from the customer.
Configuration
- Select audio: choose a previously uploaded audio file in the platform.
- Manage audio: if the desired audio does not exist, you can upload a new file or record one directly from the tool.
- Languages: if the IVR is multilingual, make sure the audio exists in all configured languages.
Practical example
- Welcome: "Thank you for contacting us, we will attend you shortly."
- Informational notice: "Our business hours are Monday through Friday from 9am to 6pm."
- Pre-transfer message: "We are connecting you with an agent, please hold the line."
 Text to Speech
Text to SpeechThis activity allows you to convert text to audio using different Text to Speech (TTS) providers.
- Google TTS: simply select the language and write the text to be played.
- Amazon Polly: requires entering the Amazon account details, selecting the language and voice, and then writing the text to be played.
When executed, the generated audio is played in the selected language.
 Transfer
TransferThe Transfer activity allows you to redirect the call to another destination inside or outside the platform. It is useful for connecting the user with an agent, a specific campaign, or an external number.
Configuration
- Transfer type:
- Campaign: sends the call to a defined campaign.
- Agent: transfers the call directly to a specific user.
- External number: redirects the call to a landline or mobile phone.
- Campaign/Agent/Number field: depends on the selected transfer type.
To transfer to the campaign in which the IVR is running, select the Campaign transfer type and leave the campaign field empty.
Practical example
- Menu option 1: Transfer to the Technical Support campaign.
- Menu option 2: Transfer to a VIP agent.
- Menu option 3: Transfer to an external number (e.g., emergency hotline).
'%3e%3cpath%20d='M31.71%2019.6701C28.5504%2016.6679%2024.3585%2014.9939%2020%2014.9939C15.6416%2014.9939%2011.4496%2016.6679%208.29002%2019.6701C8.19734%2019.7635%208.12401%2019.8744%208.07425%2019.9962C8.02448%2020.118%207.99926%2020.2485%208.00002%2020.3801C8.00112%2020.6424%208.10527%2020.8938%208.29002%2021.0801L10.77%2023.5601C10.8658%2023.6552%2010.9799%2023.7299%2011.1054%2023.7798C11.2308%2023.8296%2011.3651%2023.8535%2011.5%2023.8501C11.754%2023.8465%2011.9971%2023.7464%2012.18%2023.5701C12.9749%2022.831%2013.8705%2022.2081%2014.84%2021.7201C15.0083%2021.6376%2015.1501%2021.5095%2015.2491%2021.3504C15.3481%2021.1913%2015.4004%2021.0075%2015.4%2020.8201V17.7201C16.8862%2017.2407%2018.4384%2016.9977%2020%2017.0001C21.5593%2016.9951%2023.1092%2017.2416%2024.59%2017.7301V20.8301C24.5896%2021.0175%2024.6419%2021.2013%2024.741%2021.3604C24.84%2021.5195%2024.9817%2021.6476%2025.15%2021.7301C26.1247%2022.2146%2027.024%2022.8377%2027.82%2023.5801C28.0029%2023.7564%2028.246%2023.8565%2028.5%2023.8601C28.635%2023.8635%2028.7692%2023.8396%2028.8947%2023.7898C29.0201%2023.7399%2029.1342%2023.6652%2029.23%2023.5701L31.71%2021.0901C31.8037%2020.9971%2031.8781%2020.8865%2031.9289%2020.7647C31.9797%2020.6428%2032.0058%2020.5121%2032.0058%2020.3801C32.0058%2020.2481%2031.9797%2020.1174%2031.9289%2019.9955C31.8781%2019.8737%2031.8037%2019.7631%2031.71%2019.6701ZM13.4%2020.2201C12.7424%2020.5943%2012.1169%2021.0225%2011.53%2021.5001L10.46%2020.4201C11.3643%2019.6711%2012.3506%2019.027%2013.4%2018.5001M28.5%2021.5001C27.903%2021.0248%2027.2675%2020.6%2026.6%2020.2301V18.5301C27.6578%2019.0396%2028.6487%2019.6777%2029.55%2020.4301L28.5%2021.5001Z'%20fill='white'/%3e%3c/g%3e%3cdefs%3e%3cclipPath%20id='clip0_2795_35568'%3e%3crect%20width='24'%20height='24'%20fill='white'%20transform='translate(8%208)'/%3e%3c/clipPath%3e%3c/defs%3e%3c/svg%3e) Hang up
Hang up
Hang upThis activity ends the call when executed. It does not require any additional configuration.
Manage Audio
When an activity requires audio, you will see the + icon next to the field. Clicking it will open a form where you can:
- View the list of audio files available in the IVR.
- Add new audio files.
To add a new audio:
- Enter a name.
- Upload an audio file or record one directly.
- Before saving, you can play it back to verify it.
If you need the same audio in different languages, simply create an audio with the same name in each language. The IVR will automatically select the correct version based on the configured language.
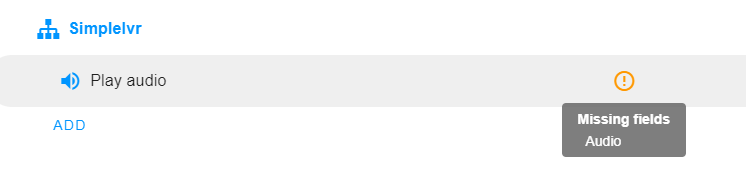
Manage Errors
If there are required fields left empty, a warning will appear next to the activity in the tree. You can hover over the warning to see which fields are missing.
When you try to deploy with pending errors, a modal will appear that stops the action. From there you can directly access the activities and complete the required information.
If you wish to deploy the IVR without completing all fields, you can simply click the deploy button in the errors modal. However, it is important to note that this may cause unexpected issues.
Save and Activate
You have two options to save your work:
- Save: saves the changes without deploying them. The IVR will remain in Development state.
- Deploy: saves and deploys the changes. The IVR will be in Deployed state.
At the top you will see the date of the last deployment. If it has never been deployed, it will show as "never".
Done! Now you know how to create, configure, and deploy a Simple IVR.